9 Essential IT setup
🏢 Lab class
For your labs, you’ll need to get a few things set up on your computer. Here’s what to do:
- Use a recommended browser as your default browser (i.e., Chrome, Brave, Edge or Firefox; but not Safari).
- Change some file manager settings.
- Find out how to create zip files and how to unzip them. You will need to know this for submitting assessments!
- Install the Microsoft 365 office apps provided by the university.
- Use OneDrive.
- Install PsychoPy.
💻 If you are about to buy a computer, don’t buy one running Chrome OS. Various essential pieces of software will not run on it.
😀 We make these recommendations to make your lives as students easier and more enjoyable. Yes, making the changes we suggest will require some effort initially (and possibly some AI conversations), but we promise that you will benefit in the long run!
🏠 Self-study
9.1 General points
As the computers in our labs are running macOS, our main focus will be on macOS. However, we will highlight some key points for Windows users.
We will not cover installing SPSS (an app for statistical data analysis), as this will be covered in your statistics lectures.
9.2 Web browser
What will you use the web browser for?
- To read material available online.
- To download material from the internet.
- To search the internet.
Make sure you have one of these web browsers installed and set it as your default browser:
- Chrome: For those who want things to just work (at the cost of privacy).
- Brave: For the privacy-conscious.
- Edge: For those who like to use Microsoft 365 web applications (as opposed to desktop applications).1
- Firefox: For the non-conformists. Firefox is the only surviving major web browser that is not based on Google’s Chromium project.
Please do not use Safari. Safari likes to do some things differently and this will cause various issues over the course of the year. Save yourself the trouble and use one of the web browsers recommended above as your default browser. Find out how to change your default web browser here.
9.3 File manager
What will you use the file manager for?
- To create, move, copy or delete files and folders.
- To navigate your file system. Among other things, we expect you to be able to find files that you have downloaded from the internet.
- To compress and uncompress files.
The file manager on macOS is called Finder, on Windows it is called File Explorer. We assume that you know how to use your file manager to move and copy files and will therefore not explain this in more detail. To make navigating the file system easier, we would like you to make a few changes to the default Finder settings though. We will then explain how to compress and uncompress files.
9.3.1 macOS users: Changes to Finder settings
Please make the following two changes to your Finder settings.
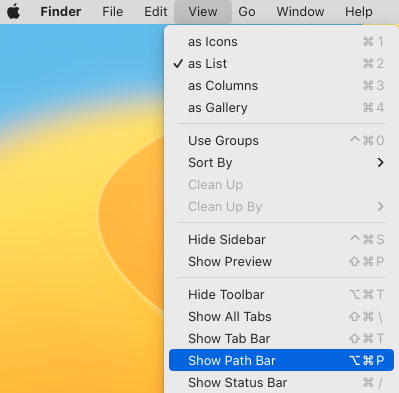
1. Show the path bar
- Click on your Finder icon:

- Click on View.
- Click on Show Path Bar.
As a result of this change, you will now see the current path displayed at the bottom of your Finder windows, e.g.:

Note that you can click on the folder names in the path bar to directly jump to one of the folders in the path.
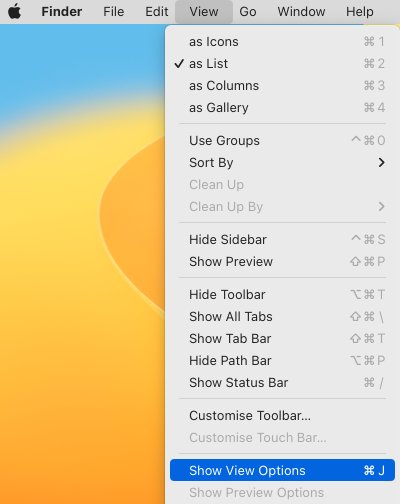
2. Change to list view
- Navigate to your Documents folder (e.g., click on “Documents” in the Finder sidebar).
- Click on View in the menu bar.
- Click on “as List”.
- Click on View again.
- Click on “Show View Options”.
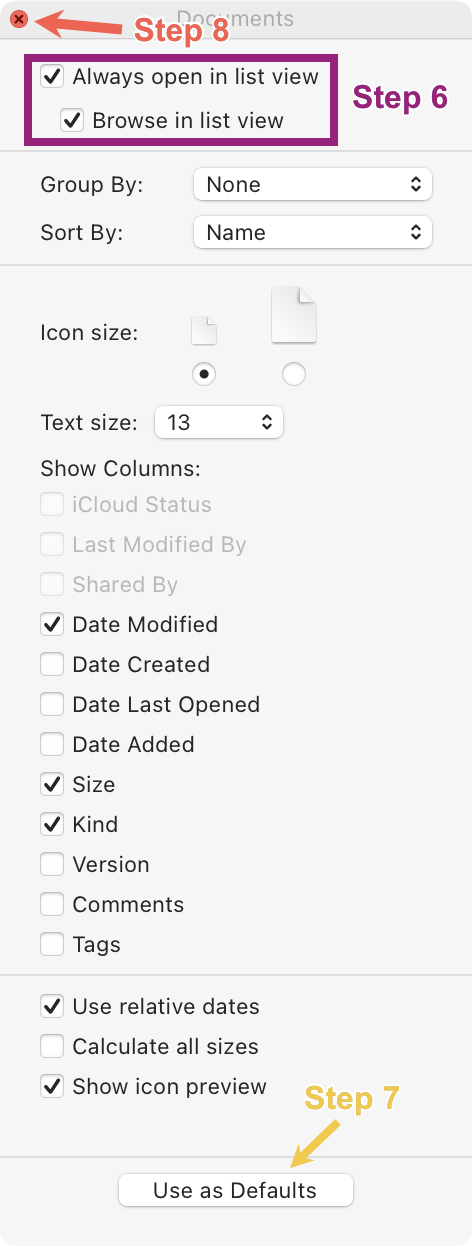
- Select “Always open in list view”. Make sure “Browse in list view” is also selected.
- Click on “Use as Defaults”.
- Close the popup window.

List view is useful as it shows you key information about files that are not readily available using the other view options. Most importantly, this includes the date on which a file was last modified (you can also add “Date created” using “Show View Options”, as well as others) and the file size. When we start working on creating experiments, you will likely find that, e.g., knowing the time when a file was last modified can be extremely helpful when you’re trying to identify the file you have most recently been working on.
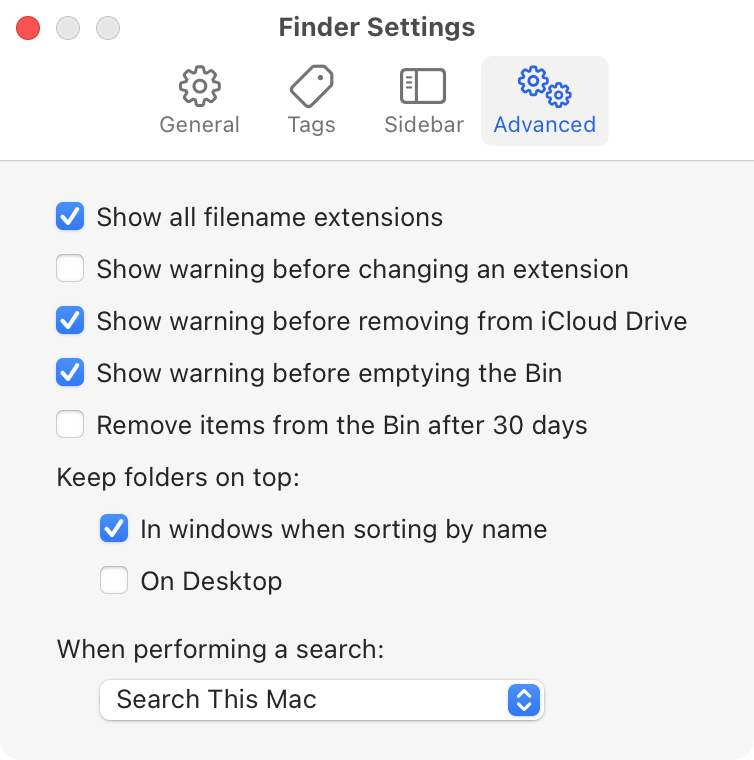
3. Keep folders on top
A somewhat annoying Finder default setting is that folders and files are intermixed when files are sorted by name. It is usually preferable to have folders listed first though. Here is how to achieve this:
- Go to the Finder.
- Click on Finder.
- Click on Settings.
- Click on Advanced.
- Tick “Keep folders on top: In windows when sorting by name”.
9.3.2 Windows users: Changes to File Explorer settings
The Windows File Explorer has an extremely annoying default setting (and in fact one that is a security risk): It hides file name extensions. Please do make sure to display these by clicking on View and then by ticking the “File name extensions” box.
9.4 ZIP files
What will you use ZIP files for?
- We will provide you with resources in the form of ZIP files.
- You will need to upload a ZIP file to Moodle for a future assignment.
ZIP is an archive file format that supports lossless data compression. A ZIP file may contain one or more files or directories that may have been compressed. (Wikipedia)
As mentioned on Wikipedia, a single ZIP file can contain many files and folders. This is advantageous as it simplifies data downloads and uploads—instead of having to download or upload many files individually, you only have one file you’re dealing with.
9.4.1 ZIP files on macOS
Unzip a ZIP file
- Navigate to the ZIP file in the Finder.
- Double-click on the ZIP file.
→ The unzipped folders or files will appear in the location where you unzipped the file.
Create a ZIP file
To zip a folder:
- Right-click on the folder you want to zip.
- Click on Compress.
→ A file called <yourFolderName>.zip will be created in the location where you zipped the folder.
To zip multiple files:
- Select the files you want to zip.
- Right-click on one of the files.
- Click on Compress.
→ A file called Archive.zip will be created in the location where you zipped the files.
9.4.2 ZIP files on Windows
Unzip a ZIP file
- Navigate to the ZIP file in the File Explorer.
- Right-click on the ZIP file.
- Click on “Extract all…”.
If you double-click on a ZIP in File Explorer, Windows will let you “look into” the ZIP file, but it won’t be unzipped! Thus, it is vital that you use “Extract all”!
Create a ZIP file
To zip a folder:
- Right-click on the folder you want to zip.
- Select “Send to”, and then select “Compressed (zipped) folder”.
To zip multiple files:
- Select the files you want to zip.
- Right-click on one of the files.
- Select “Send to”, and then select “Compressed (zipped) folder”.
9.4.3 Try it out
Download the ZIP file below. By default, downloads are saved to your Downloads folder. On macOS, the absolute path to your Downloads folder is /Users/yourUsername/Downloads. If the unzipping procedure is successful, you should see a folder with images. Please let us know if you run into any issues!
9.5 Microsoft 365
What will you use Microsoft 365 for?
- You will use Excel to analyse data.
- You will use Word to write documents.
- You will use OneDrive to store files.
Yes, your Mac comes with Pages, Keynote and Numbers installed, but we nevertheless highly recommend to install MS Office. The university is very much focused on MS Office, and you will live a happier life if you accept this and use MS Office instead of the native macOS apps.
9.5.1 Installing Microsoft 365
Excel, Word and OneDrive are all part of what Microsoft refers to as Microsoft 365. Thus, you only need to install Microsoft 365 and you should have all the relevant apps.
- Uninstall previous versions of MS Office.
- Log in to portal.office.com using your university login and password.
- On the Microsoft 365 homepage, click on “Apps” and then on Install apps”:
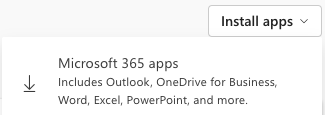
- Download the installer file.
- Once the download is complete, click on the installer file and follow the instructions.
Note that on your Microsoft 365 homepage (i.e., the page you see after logging in to portal.office.com), you will also find web applications for Word, Excel, etc. However, we would recommend to use the locally installed desktop versions whenever possible as the web applications do not yet have all the features the desktop versions have.
9.5.2 Using OneDrive
We recommend that you store all your university-related files in OneDrive. Using OneDrive has several advantages:
- You can access your files from any computer with an internet connection.
- There is plenty of space available (5 TB).
- When you open a file on OneDrive using one of the Office apps (e.g., Word), any changes made will be automatically saved on OneDrive.
- OneDrive also creates a file history, allowing to restore previous versions of a file.
You can access OneDrive as a web application from your Microsoft 365 homepage by clicking on “Apps” in the sidebar and then on OneDrive. Alternatively, you can click on the App Launcher (the nine dots in the upper left corner) and then on OneDrive. The OneDrive icon looks like this:

We would recommend to create the following folder structure:
Year1
├── PSGY1001
│   ├── Lab1
│   ├── Lab2
│   └── etc.
├── PSGY1002
│   ├── Lecture1
│   ├── Lecture2
│   └── etc.
└── etc.
You can create a new folder on OneDrive by clicking on New and on Folder:

9.6 PsychoPy
What will you use PsychoPy for?
- To create experiments.
- To run experiments.
- To collect data.
Installing PsychoPy
If you are using one of the iMacs in A20/21, you do not need to install PsychoPy—it is already installed.
Here’s how to install PsychoPy on macOS:
- Download PsychoPy. We would highly recommend to download the current stable version.3
- After the download has completed, click on the downloaded file.
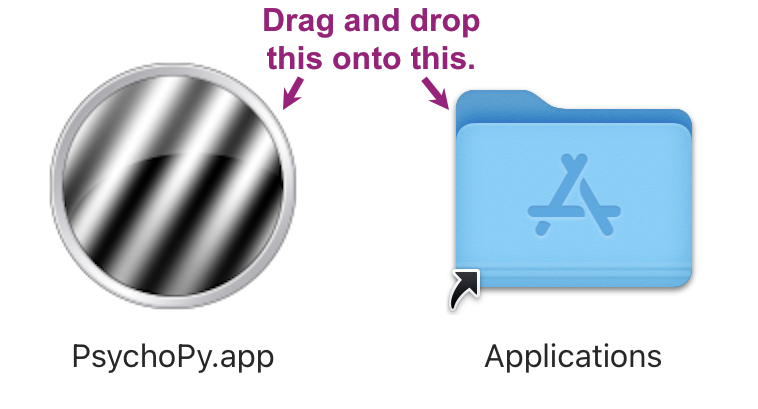
- Drag and drop the PsychoPy icon onto the Applications folder icon (and wait for a while). If you do not complete this step, PsychoPy will not be installed properly!4
After the installation is complete, you need to make two important changes in your system settings. If you do not make these changes, PsychoPy will not work.
- Open your system settings.
- Click on “Privacy & Security”.
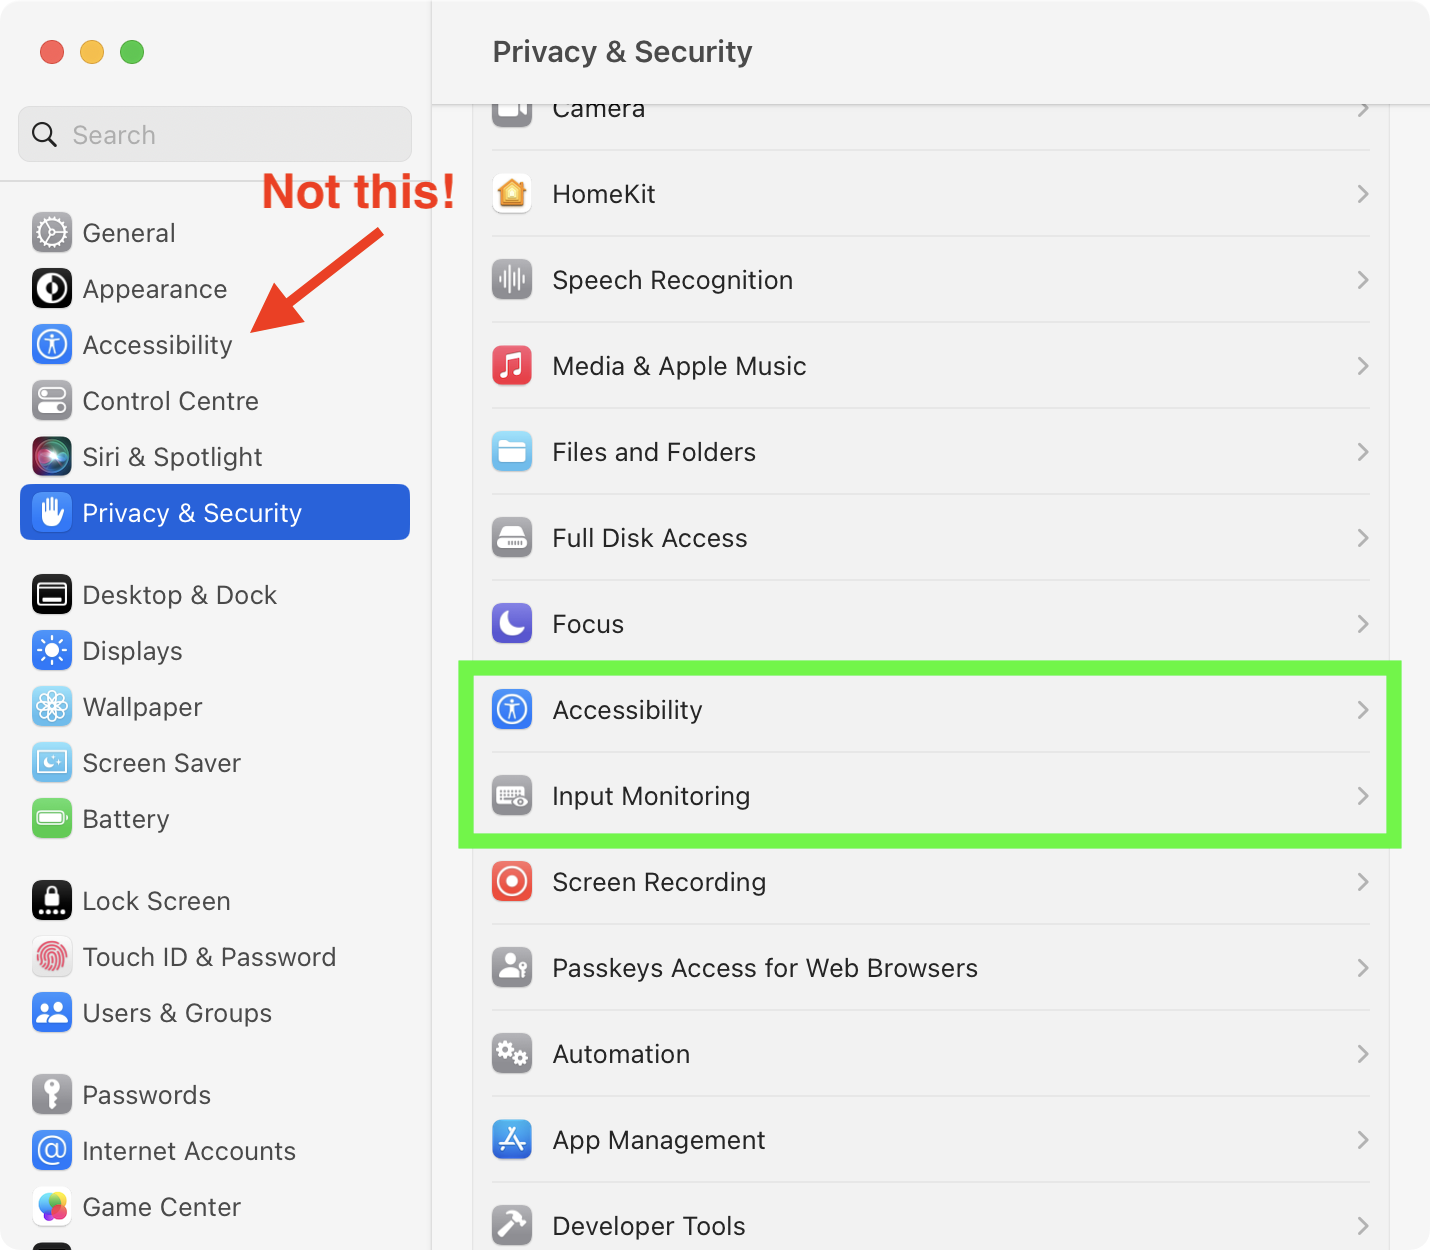
- Click on “Accessibility”. Note that this refers to “Accessibility” within “Privacy & Security”, not “Accessibilty” in the sidebar on the left (if in doubt, see screenshot below)! You will probably need to scroll down for this to become visible.
- If PsychoPy is already listed, make sure the switch on the right is set to “On”.
- If PsychoPy is not yet listed, click on the plus symbol, navigate to your Applications folder and add PsychoPy.
- Click on the back arrow to return to “Privacy & Security”.
- Click on “Input Monitoring”.
- If PsychoPy is already listed, make sure the switch on the right is set to “On”.
- If PsychoPy is not yet listed, click on the plus symbol, navigate to your Applications folder and add PsychoPy.
System settings:
![]()
Privacy & Security:
In Accessibility:

In Input Monitoring:
9.7 Confirmation
Please confirm you have worked through this chapter by submitting the corresponding chapter completion form on Moodle.
I have the impression that Microsoft 365 web applications tend to work best with Edge. I could be wrong though.↩︎
Another advantage is that you can send someone to a different location without knowing the absolute path. E.g., in our example, you don’t need to know if the next level up is called
flat1orapartment1.↩︎Older PsychoPy releases can be found on the PsychoPy GitHub page.↩︎
If you’ve never installed an app on your Mac using this approach before, you might be interested in this page describing different ways to install software on a Mac.↩︎