42 Miscellanea
🏠 Self-study
42.1 PsychoPy processes components from top to bottom
Within a routine, PsychoPy processes components from top to bottom. If you would like to draw a star1 on top of a square, the square needs to come first, followed by the star:

42.2 Names must be unique
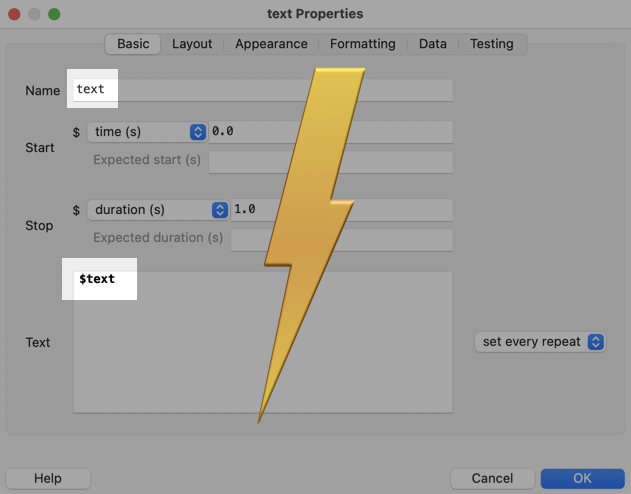
In addition to following the naming restrictions described previously, you must also make sure that all names are unique. For example, if you have a Text component whose name is text, you cannot also use a variable called $text.
This restriction applies across all routines, components and variables of an experiment. For example, if you’re using $stim in any one routine, you will not be able to use that variable name in any other routine, no matter where in your experiment it appears.
42.3 Skipping routines
Sometimes you might want to not present a routine. In PsychoPy, this can be done by using continueRoutine in a code component. For example, you might want to present “Too slow!” feedback only if participants took more than 1.5 s to respond. This can be achieved with a feedback routine that has the following code component in the “Begin routine” tab:
if response.rt > 1.5:  # if the response was slower than 1.5 s
    continueRoutine = True  # present the feedback routine
else:
    continueRoutine = False  # do not present the feedback routine
Below the code component, the feedback routine would also need a Text component that displays the text “Too slow!” if the routine is presented. This text could be set to constant as it never changes.
For testing purposes, it is often convenient to skip multiple routines (e.g., if you don’t want to run the practice trials, and instead want to run the main trials straight away). This can be achieved by adding a loop around these routines and setting “Num. repeats” for this loop to 0.
42.4 Copying and pasting routines and components
In Chapter 28, we briefly mentioned that the “Experiment” menu in the menu bar gives you the option to copy and paste routines:
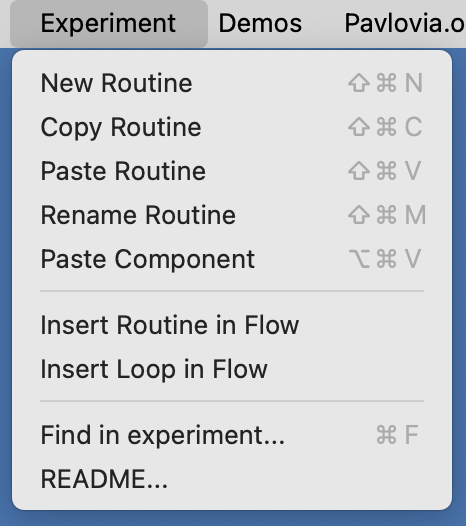
To copy a routine, click on the routine’s tab (if it is not already selected), then click on “Experiment” and “Copy Routine”. Finally, click on “Experiment” and “Paste Routine”.
It is also possible to copy components. To copy a component, right-click on the component and then click on “copy”. Then click on the routine into which the component should be inserted, and click on “Experiment” and “Paste Component”.
The way to copy and paste routines and components across experiments is to open two Builder windows. Here is how to do this:
- Open the first experiment as usual.
- Then click on File → New to open a second Builder window.
- Then click on File → Open to open your other experiment in the second Builder window.
Please make sure to follow these exact steps!
In the past, copying/pasting routines under Windows would not work if you opened the second experiment by double-clicking on the .psyexp file in the File Explorer. It was necessary to use File → New instead. As I do not have a Windows operating system, I am not sure if that is still the case.
42.5 PsychoPy demos
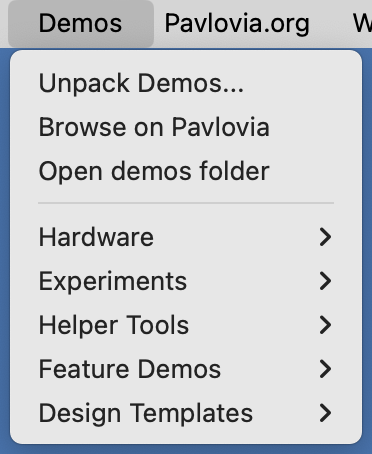
PsychoPy comes with a number of demos included. To see the demos, you need to click on “Demos” in the menu bar and then on “Unpack demos”. Next, you need to choose a location on your computer where the demos should be unpacked (this will create a new folder “PsychoPy3 Demos”). If you now click on “Demos” in the menu bar again, a list of demos will be displayed:
A useful demo is the “keyNameFinder” (in “Helper Tools”). It displays key names on the screen. If you would like to use a particular key in your input file, but you are not sure what its name is, run this demo.
The demo “spatialUnits” (also in “Helper Tools”) is helpful for understanding PsychoPy’s spatial units (height, norm, pix, etc.). This demo can be used in addition to our interactive app for visualising PsychoPy spatial units.
42.6 PsychoPy problems and errors
Appendix B includes a checklist for evaluating your experiment and covers frequently encountered PsychoPy error messages.
42.7 Confirmation
Please confirm you have worked through this chapter by submitting the corresponding chapter completion form on Moodle.
You can draw simple geometrical shapes in PsychoPy using the Polygon component in the “Stimuli” components section.↩︎