29  Beyond the single trial

This week, you will learn how to present multiple trials in PsychoPy using loops and input files. Our previous exercises focused on running a single trial. However, in a typical experiment, we have of course more than one trial. In theory, we could define a new routine for every individual trial:

Flow with multiple individual trials and no loops.

However, given that experiments can include hundreds of trials, it would be extremely time-consuming and laborious to set up such an experiment. This is where loops come in:

Flow with a trial and a loop around it.

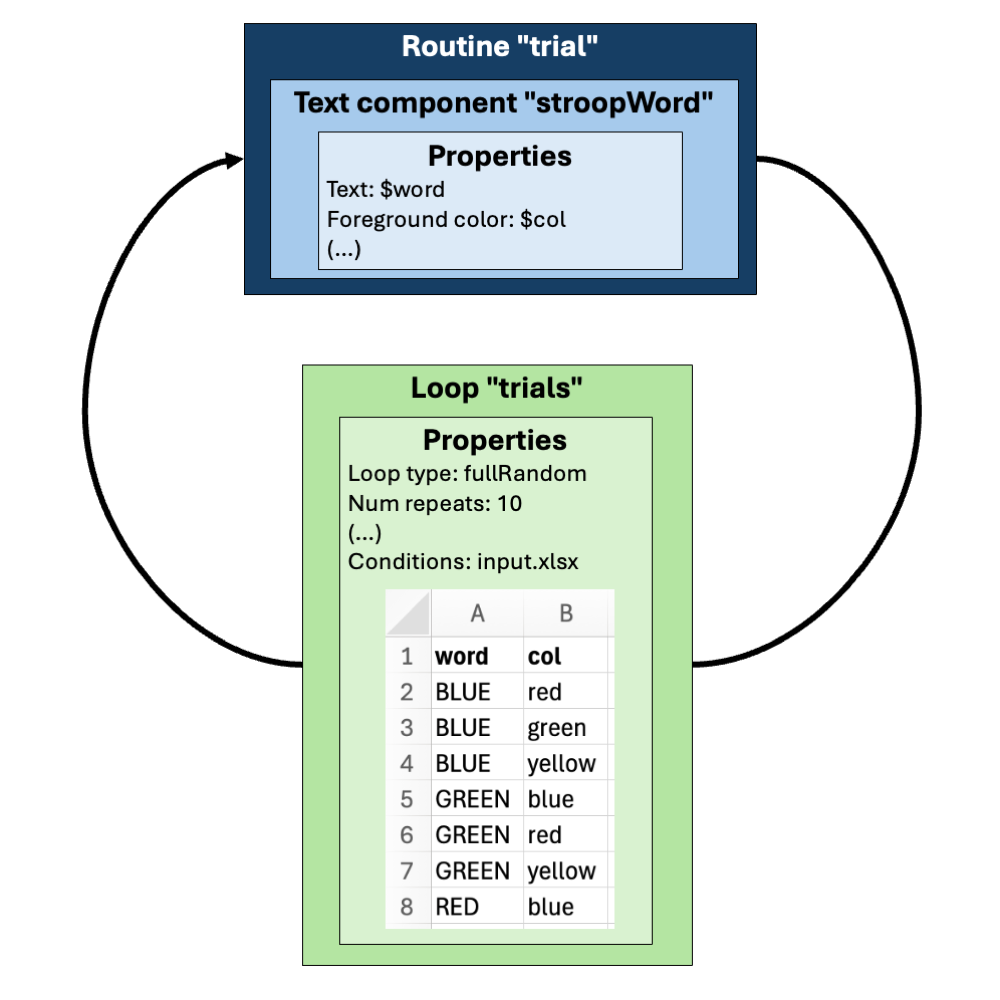
Using a loop, you define a trial template, and repeat it as many times as necessary while updating some information from one trial to the next. The analogy from our multi-course meal was this:

When routines are repeated in a loop, typically something changes from one repetition to the next. If we were to stretch our analogy a bit, it could be the waiter coming over to your table repeatedly and on each occasion serving a new type of bread: “Here is a slice of bread with walnuts.” “Here is a slice of bread with pumpkin seeds.” “Here is a slice of bread with sunflower seeds.” “Here is a slice of bread with flax seeds.”

If we are only changing the nuts and seeds across bread variants, it would make sense to prepare the dough only once, and to then add the nuts and seeds as needed.

Warning

One of the most frequent errors made by PsychoPy beginners is this: If you want to change a component property (a piece of text, an image,…) in a routine from one trial to the next, this property can’t be fixed. It must be defined using a variable. If, for example, you want to change an image from one trial to the next, you can’t set up the image component using a particular image (i.e., using a file name such as cat.png). Instead, the component property must be a variable. We will show you how to define component properties using variables in the next chapter.

In terms of our bread analogy, specifying a particular image would be like adding walnuts to the dough right at the start. However, if you want the nuts and seeds to change, you can’t put one type of nuts in right at the start. Instead, you must keep them in separate bowls and only add them when they’re needed. This is exactly what you can achieve by using variables in PsychoPy.

29.1 Input file basics

How does PsychoPy know what to change from one trial to the next? We use input files (also referred to as condition files) for this purpose. An input file will typically be an Excel file.1

Let’s look at an example. Please open the input file for the letter flanker task from the previous lab (called letter_flanker_input.xlsx and located in the same folder as the .psyexp file). This spreadsheet has seven rows and three columns:

Screenshot of the input file showing stimuli, correct answers and congruency.

The first row is a header row. Please note that the naming conventions for routines and components mentioned in Section 25.5 also apply to the header row of your input file:

  • Use only letters, numbers, and underscores.
  • Always begin with a letter.
  • Keep in mind that PsychoPy is case-sensitive: stim and Stim are two different things, as are corrAns and corrans.

The rows below the header row define all stimuli that you would like to present in your experiment (plus information associated with these stimuli such as correct responses). PsychoPy refers to these rows as conditions.2

The columns are what PsychoPy calls parameters. In our flanker input file, we have three different parameters: stim, corrAns and congruency. Parameters represent information about the conditions. For example, the parameter stim will determine which letters are presented on the screen, the parameter corrAns will determine what counts as a correct answer and the parameter congruency will determine if the trial is considered congruent, neutral or incongruent.

Note that the congruency information is not required for running the experiment, but it will be useful when analysing the data. Also, it allows you to easily check how many trials of each experimental condition you have in our input file. Note how this also determines the relative frequencies of experimental conditions: No matter how often we repeat the input file in a loop, 1/3 of trials will be congruent, 1/3 incongruent and 1/3 neutral.

29.2 PsychoPy loops

To tell PsychoPy to make use of an input file, you need to attach the file to a loop. Note that multiple loops can make use of the same input file. For example, the flanker experiment uses the input file letter_flanker_input.xlsx for both the loop practiceTrials and the loop trials.

29.2.1 Loop properties

Click on the loop trials in the flanker experiment to display the loop properties. Note that the column headers of the input file are shown in square brackets below the conditions/parameters information:

The loop properties.

Here is what the fields in this properties window mean from top to bottom:

Name

The name of the loop. trials in our case.

Loop type

“Loop type” determines if PsychoPy keeps the order of non-header rows in the input file or randomises them. These are the options of interest to us:

  • sequential: The input file is not randomised. Trials are presented in exactly the same order as in the input file.
    • If we were to use ‘sequential’ for our input file, participants would always start with two congruent trials, followed by two incongruent trials, followed by two neutral trials. This is not what we typically want.3
  • random: The rows in the input file are randomised per loop repeat. Imagine you have four rows in your input file (the conditions A, B, C, and D) and you ask for two repeats (“Num. repeats”—see below). This is what PsychoPy will do:
    • First repeat
      • Take the four conditions and randomise them.
      • Example result: C, D, A, B
    • Second repeat
      • Take the four conditions and randomise them.
      • Example result: A, D, B, C
    • Trial order presented to the participant: C, D, A, B, A, D, B, C (note how the conditions are presented in groups of four).
  • fullRandom: The rows in the input file are multiplied by the number of repeats and are then randomised. Again, imagine you have four rows in your input file (the conditions A, B, C, and D) and you ask for two repeats. This is what PsychoPy will do:
    • Multiply conditions by number of repeats: A, B, C, D * 2 = A, B, C, D, A, B, C, D
    • Randomise all conditions.
    • Example result: C, D, A, A, B, C, D, B
    • Note how the four conditions are no longer grouped together.

There is only a difference between ‘random’ and ‘fullRandom’ if the number of repeats is more than 1. If ‘random’ or ‘fullRandom’ is the better choice depends on what you would like to achieve. With ‘random’, you know that your conditions will be evenly distributed across the experiment (because they are presented in groups). You can also reduce the number of stimulus repetitions, if that is a potential issue in your experiment (this is because conditions can only repeat if they happen to be at the end of one group of four and at the beginning of the next group of four). On the other hand, your participants might realise that stimuli are presented in groups of four and they might start to predict what is going to happen next. This would be a confound. Therefore, I tend to go for ‘fullRandom’ if the number of conditions is small (say, around ten conditions) and for ‘random’ if it is larger.4

For both ‘random’ and ‘fullRandom’, the randomisation will always randomise complete rows. That is, if a row includes the information HHSHH, n and incon, these parameters will always stay together.

Is trials

Not relevant for us. Simply leave this ticked.

Num. repeats

How often the input file should be repeated. In our flanker task, there are 8 repetitions of 6 conditions, so 48 trials overall.

Selected rows and Random seed

Not relevant for us.

Conditions

The name of the input file (including the path5). To add an input file to a loop, click on the folder icon, navigate to the file and add it to the loop.

29.2.2 Adding and removing a loop

To add a new loop to an experiment, you need to click on “Insert Loop” in the flow panel (or on Experiment → “Insert Loop in Flow” in the menu bar). Then, click on the timeline where you want the loop to begin.

  • If there is just one routine in the experiment, this will automatically bring up the property window discussed above. You can then edit the relevant properties and click on OK.
  • If there are multiple routines in the experiment, PsychoPy expects you to click on the location where you want the loop to end first. Once you have done so, the properties window will appear.6

To remove a loop, right-click on the loop and then click on “remove”.


  1. You can also use .csv files.↩︎

  2. Please note that this does not mean that these necessarily correspond to the conditions in your experiment. In our flanker input file, we have six rows defining stimuli, but we would usually say that we have three experimental conditions (congruent, neutral and incongruent).↩︎

  3. This option is there as sometimes we pre-randomise files, for example to exclude stimulus repetitions. If you pre-randomised a file, you do want PsychoPy to present trials in exactly the order they are in in the input file.↩︎

  4. If you have more than two repeats, say four, an alternative would be to combine the two approaches. That is, you could have A, B, C, D, A, B, C, D in your input file and then opt for random and two repeats.↩︎

  5. PsychoPy will automatically add the correct path for you if you click on the folder icon to add the input file, provided you have saved the experiment before adding the input file. If input file and experiment file are in the same folder, only the file name is required.↩︎

  6. Sometimes it happens that the loop endpoint on the timeline moves when you move the mouse pointer to the properties window. If this happens, you have to delete and reinsert the loop. If you move the mouse pointer straight up from where you clicked, you can avoid this happening.↩︎