41 Accuracy and feedback
🏢 Lab class
41.1 Determining accuracy
A parameter in a conditions file can also be used to determine if the participant gave a correct response. Here is the Data tab of the Keyboard component from our flanker task combined with a screenshot of the conditions file:
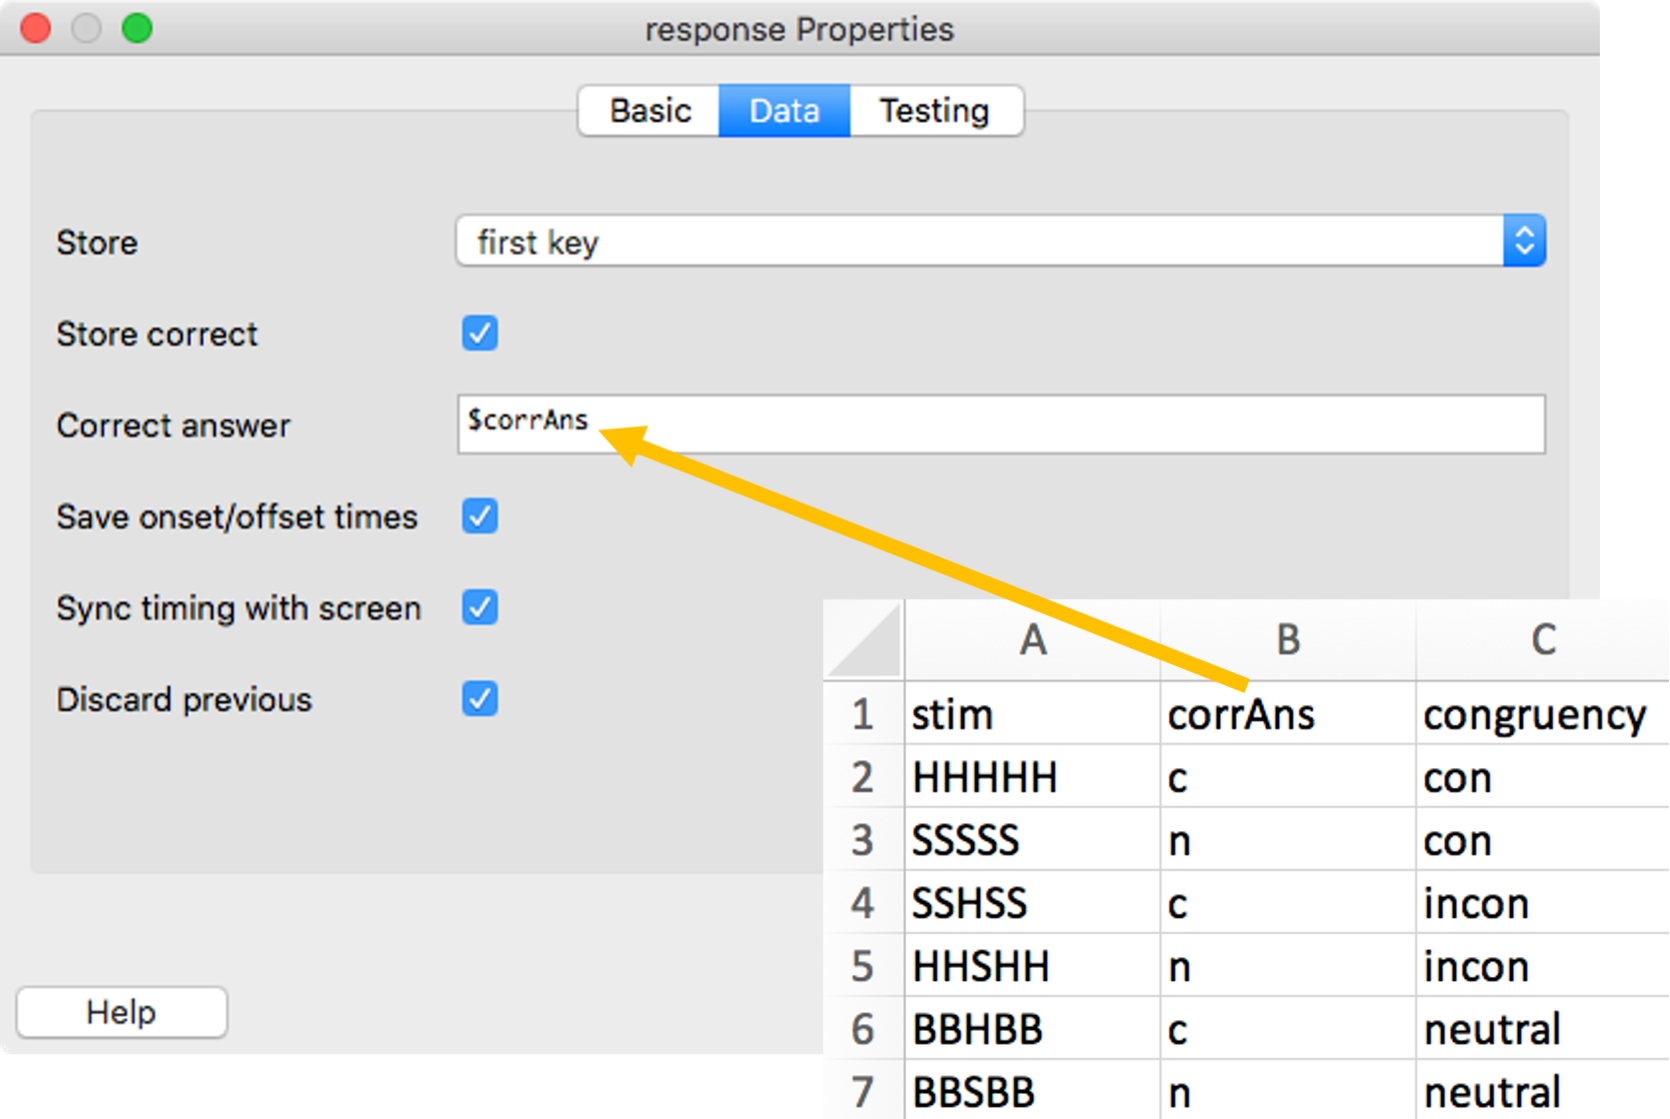
The orange arrow illustrates how the column called corrAns in our conditions file is linked with our Keyboard component. Note that you need to tick “Store correct” for the field “Correct answer” to appear. Also note that the “Allowed keys” (on the Basic tab) can be constant as the allowed keys are the same on every trial.
If “Store correct” is ticked and a variable name for “Correct answer” is provided, PsychoPy will automatically write information about the accuracy of responses to the output file it produces. However, this information is not just useful for the output file. It can also be used to give participants feedback about their performance.
41.2 Giving accuracy feedback
Sometimes you might want to give participants feedback on their performance. In particular, this might be the case while they are still practising the task, as shown in the flow of our flanker task:

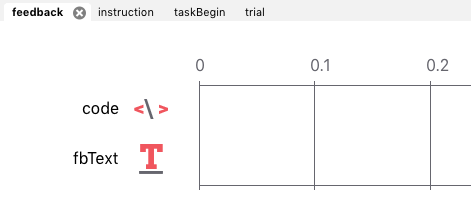
In this example, participants will be presented with a routine called feedback after every practice trial. The problem is that you cannot know what type of feedback (e.g., correct or incorrect) will be required in advance, because the feedback will depend on the participant’s response. Therefore, you will need to figure out what feedback to give on the fly. To achieve this, you need to add a Code component (located in Custom components) to the feedback routine:
![]()
Code components allow you to insert Python code into an experiment. You don’t need to learn how to write Python code to be able to do this, but you need to know a few Python basics. I’ve compiled these basics in Appendix C.
The basic idea that underlies giving accuracy feedback is this:
- You have a routine where responses can be either correct or incorrect (usually, your trial routine).
- In the Keyboard component of this routine, you tell PsychoPy to store whether or not a response was correct.
- PsychoPy automatically codes correct responses as 1, and incorrect responses as 0.
- In a subsequent routine, you use the information that PsychoPy has stored on the previous routine to provide the participant with feedback.
- If the response was correct, you present positive feedback.
- If the response was incorrect, you present negative feedback.
Let us go through how this works in our letter flanker task. Please open the flanker task from Lab 5 in PsychoPy and have a look at the relevant routines and components:
- Routine
trial- The Text component presents the stimulus.
- The Keyboard component records the response. If we told it to, the Keyboard component will also store the accuracy of the response. → This is the information we need to give accuracy feedback!
- Routine
feedback- The Code component checks whether the response was correct or incorrect.
- Depending on the accuracy, the Code component updates the message to be shown as feedback.
- The Text component presents the feedback message.
Here is what we need to know to make this work:
- The name of the Keyboard component that stores the accuracy of the response. In our flanker task, the name of the Keyboard component is
response. - PsychoPy stores the accuracy information in a variable called
<nameOfResponseComponent>.corr- The text between the angle brackets is a place-holder for the actual name of the component.
- In our example, the relevant variable would be
response.corr.
- The feedback message itself is some text that needs to change from trial to trial. Therefore, it needs to be variable. In our flanker task, the variable is called
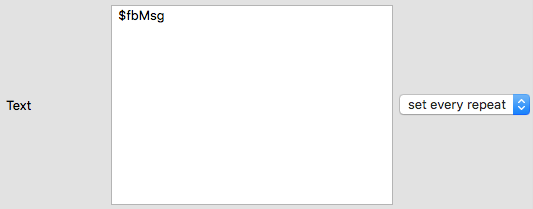
fbMsg. - After the Code component has figured out what the feedback message should be, we would like to present the feedback to the participant using a Text component. We thus need to add
$fbMsgto the Text component presenting the feedback in the routinefeedbackand set it toset every repeat.
Now, let’s look at the actual Python code. We need two pieces of code in two different places. The first piece of code is this (you can simply copy and paste the code into your experiment!):
fbMsg = "Argh! It's not working!"This needs to be placed in the “Begin Experiment” tab of the Code component:
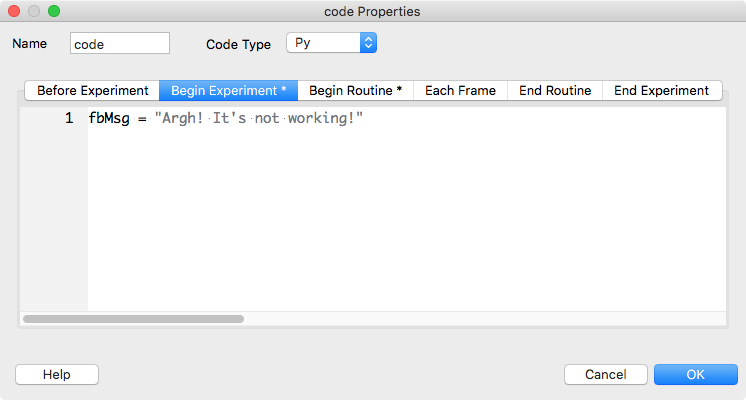
The aim of this is to define the variable and to assign a value to it that will help you figure out whether or not your feedback is working. You could simply define an empty string, but this will make it harder to determine what is going wrong if the feedback doesn’t work as intended:
fbMsg = "" # possible, but not useful!The second piece of code is this:
if response.corr == 1:    # if the response was correct
    fbMsg = "Correct!"    # this should be our FB message
else:                     # alternatively (i.e., the response was incorrect)
    fbMsg = "Incorrect!"  # this should be our FB message
This needs to be placed in the “Begin Routine” tab of the Code component:
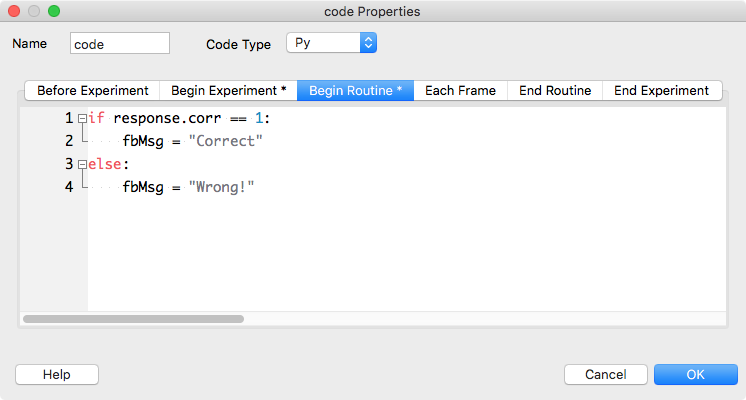
Note that the order of components is important! In the routine feedback, the Code component needs to be above the Text component, otherwise the feedback will not work (see Section 42.1):
🏠 Self-study
41.3 Too slow feedback
For some experiments, you might also want to give “Too slow!” feedback if a participant does not respond before a set RT deadline.1 In this case, you need to slightly modify the above approach, because PsychoPy codes both “wrong” responses and “too slow” responses as 0. Thus, we also need to check whether or not a key was pressed to decide if the feedback should be “Too slow!” or “Wrong!”. This is the code:
if response.corr == 1:  # correct response
    fbMsg = "Correct!"
elif response.corr == 0 and response.keys != None:  # incorrect response given
    fbMsg = "Wrong!"
elif response.corr == 0 and response.keys == None:  # no response given
    fbMsg = "Too slow!"
How does this work?
- PsychoPy stores the information about pressed keys in a variable called
<nameOfResponseComponent>.keys. ==meansis equal toand!=meansis not equal to.- In Python,
None(capitalisation is again important here!) means “no value”; here it means that no response keys were pressed.
You could replace the second elif statement by simply saying else:, but being more verbose sometimes makes it easier to understand what the code does.
41.4 Confirmation
Please confirm you have worked through this chapter by submitting the corresponding chapter completion form on Moodle.
Note this requires that your trial has a defined Stop time. Otherwise it will never end and participants can not be too slow.↩︎