Chapter 27 Lab 6 exercises
27.1 Main exercise
In your view, the 2-letter version of the letter flanker task has a confound: congruent stimuli always consist of exactly the same letters, whereas incongruent stimuli consist of different letters. You wonder if the interference effect could be due to the fact that the row of identical letters in congruent trials speeds up letter recognition, and not the fact that in incongruent trials flanker and target map onto different responses.
You plan to investigate this question by creating a 4-letter version of the flanker task as a 4-letter version allows for congruent trials where flankers and target differ.
The four letters in your task and the correct responses are:
- B and G: left arrow key
- D and Q: right arrow key
For the purpose of defining correct responses in an input file, the names for the arrow keys are left and right.
Please create an experiment that fulfils the following criteria:
- Congruent and incongruent trials should be equally frequent.
- Congruent trials should not include strings of identical letters (e.g.,
BBBBB). - There should be 64 trials overall.
- The input file should be repeated 4 times.
- The letter presentation should begin 0.5 seconds after the start of the trial.
- The presentation of the letters should end when a response key is pressed.
- Trials should be presented in random order.
- PsychoPy should write accuracy information to the output file.
- Trial-wise congruency should also be coded in the output file.
Your stimuli should be:
- 150 pixels high
- White on black background
- Presented in the centre of the screen
OMG! I don’t know where to start!
Start by opening my version of the flanker task the you previously downloaded and try to work out how this task works. Run it. Play around with it. Change things and see what happens. As mentioned in the previous lab, you can’t really break anything. If you change something and the task no longer works, simply download it again (or make a copy or the original version before you make changes to it).
Once you think you have a sufficient understanding of how the task works, try to adapt the two-letter version instead of creating a completely new experiment.
How do I set up the input file? (Hint 1)
The basic idea is to create all possible letter combinations that meet the criteria defined above.
I’ve read Hint 1, but I’m still stuck on the input file. (Hint 2)
You might be puzzled by the fact that you end up with fewer possible congruent stimuli (4) than incongruent stimuli (8). The solution is to simply duplicate the congruent stimuli, so you have eight congruent and incongruent stimuli.
Aaaarghhh!!! I’ve read Hint 1 and Hint 2, but I’m still stuck. (Hint 3)
These are your eight congruent stimuli:
BBGBB, BBGBB, GGBGG, GGBGG, DDQDD, DDQDD, QQDQQ, QQDQQWhy are these stimuli congruent although the letters differ? Think back to the Stroop task explained in Chapter 16: Why is the stimulus RED congruent? The word “RED” and the colour red are obviously different. Yet the stimulus is congruent. It is congruent because the relevant dimension (the colour) and the irrelevant dimension (the word) map onto the same response (“red”). The same is true for your congruent flanker trials: “B” and “G” are associated with the same response (“left arrow key”).
These are your eight incongruent stimuli:
DDBDD, QQBQQ, DDGDD, QQGQQ, BBDBB, GGDGG, BBQBB, GGQGGYou now have 16 “conditions” in your input file. Thus, you need four repetitions to achieve 64 trials overall.
You can watch a video of the solution here:
27.2 Challenge exercise
Build a Posner cueing task. The Posner cueing task is a spatial attention task. Among other things, it can be used to show that participants can move their attention without moving their eyes.
In this task, participants are asked to indicate the location of a target on the screen as quickly and accurately as possible. The target can be on the left or on the right side of the screen. Shortly before the target appears, an irrelevant cue is shown on the screen. The cue is presented on the right side, in the middle or on the left side. While the cue does not help with locating the target (as left cues are equally frequently paired with left targets and right targets and vice versa), we nevertheless tend to shift our attention to the side where the cue was presented. This shift occurs even when we continue to look straight ahead (which is why the task shows that attention and eye movements can be dissociated).
In our example implementation, the target will be a red triangle. If the triangle is on the left side, participants should press z key, if it is on the right, they should press the / key. The triangle will appear inside a grey square located on the left or on the right side of the screen. In addition, there will be a grey square in the middle of the screen used for neutral cues. The cue will be a colour change of one of three squares.
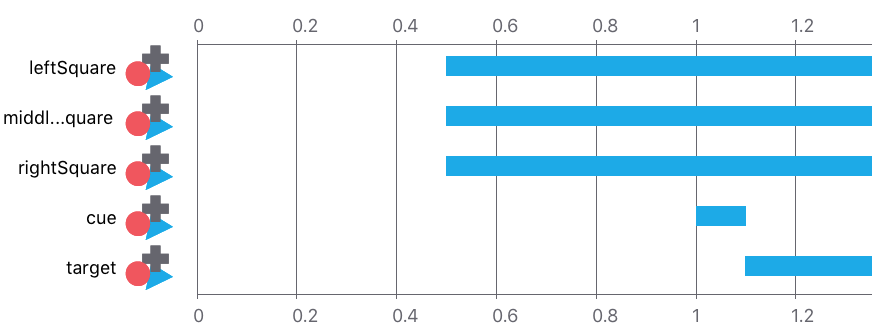
Your trials should have the following trial structure and timing:

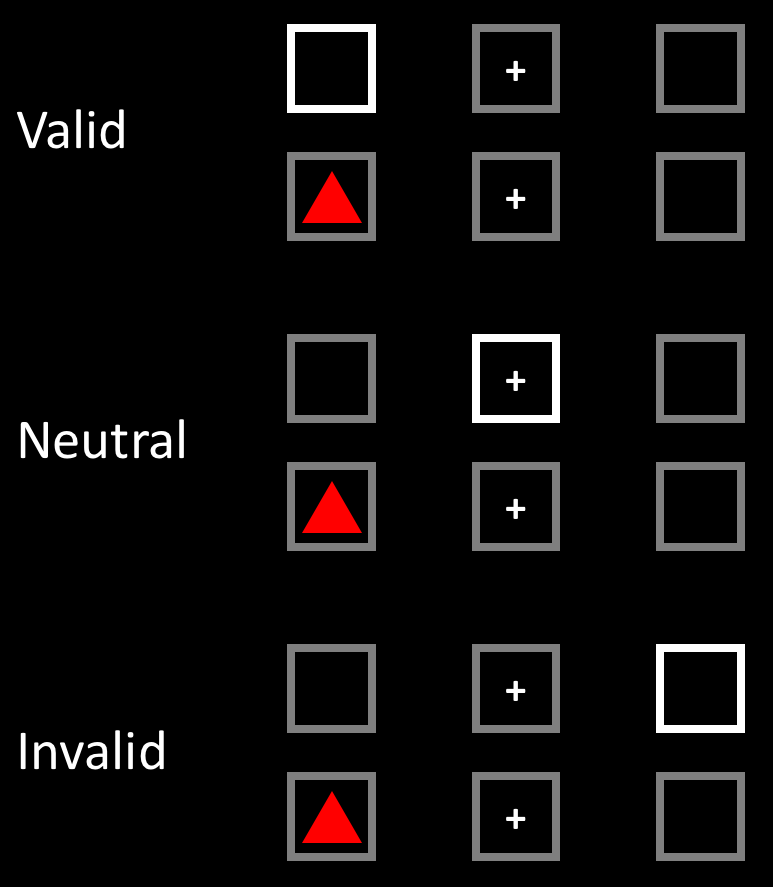
Combining cue locations with target locations gives us three possible trial types (valid, neutral and invalid), illustrated in the figure below. For example, a cue on the left, followed by a target on the left is referred to as a validly cued trial:

Participants should complete 24 trials overall. Trial types should be equally frequent. Apart from the relevant information about the stimuli, your input file should also include information about the correct response and the validity of the trial. Colours should be similar to ones shown in the figures above.
Use PsychoPy’s Polygon component to create the stimuli (found under Stimuli components). As always, there are multiple ways to implement a task. Think about what the easiest way to create this task is. It often helps to draw what you’re trying to achieve. For example, you could attempt to draw the components that you need in your trial as well as their respective timing.
Hint 1
Only look at this hint after you’ve thought about what the best way to implement the task is. Thinking about how to implement the task efficiently is just as important as actually implementing the task. Finding a good solution can save you a lot of time later.
In my view, the simplest solution would be to have a separate polygon component for the cue. This component needs be added below the other squares:

Adding it below the other squares means that it will drawn on the screen last (and thus on top of the other squares). For this component, the only thing that needs to change from trial to trial is the location. Everything else can be constant. The other three squares can be completely constant; i.e., nothing needs to change from trial to trial (and thus they don’t show up in the input file at all). In terms of stimuli, the only other thing that changes from trial to trial is the location of the target.
Hint 2: How do I get the stimuli to change locations from trial to trial?
In this experiment, cue and target position need to vary from trial to trial. Thus, you need two columns in your input file that indicate which position the cue and the target should have on each trial. As the stimuli never change their position on the y-axis, it is sufficient to vary the position on the x-axis. You could thus label the corresponding columns in your input file xPosCue and xPosTarget (or whatever helps you to remember what it is these columns do).
For your Polygon component for the cue, you would then use this in the Position field: (xPosCue, 0) (note that the Position property already has $-sign, so you don’t need to add this here)