Chapter 20 PsychoPy output files
PsychoPy output files contain information about the experiment, including response times and accuracies for each trial. You need these files to statistically analyse the data, which will be our focus in the upcoming labs.
The most important rule first: Never ever edit a .csv output file. Instead, make a copy, save the copy as an Excel .xlsx file and edit the Excel file. If you follow this basic rule, nothing terrible can happen.
Why should you not edit the .csv files? The .csv files contain your raw data. You must not change your raw data. If you still have your raw data, whatever goes wrong later in the analysis process, you will always be able to start from scratch.
20.1 Location of output files
- PsychoPy puts output files in a folder called
data.- This folder is automatically created when you first run an experiment.
- The folder is located in the same directory as your experiment
.psyexpfile.
- For each participant, there will typically be three types of files in this folder.
.csvfiles.logfiles.psydatfiles
- We will only focus on the
.csvfiles.
Please make sure you have an output file open in Excel when you read the remainder of this chapter. For example, complete my version of the flanker task that you previously downloaded (or download the task again here).
For the experiment you just ran, please make sure that…
- The folder
dataexists. - It includes the
.csv,.logand the.psydatfiles. - You can open the
.csvfile using Excel.- If you’re using macOS, by default
.csvfiles will be opened with Numbers. To change this, right-click on a.csvfile, then click on “Get Info” and then on “Open with”. Now, choose Excel from the the dropdown menu and make sure to also click on “Change all”.
- If you’re using macOS, by default
- You can save the
.csvfile as an.xlsxfile.- You need to go to “File” and “Save As…”.
- Your “File Format” needs to be “Excel Workbook (.xlsx)”.
20.2 The output file name
By default, this is how the output file name is constructed: <participant_ID>_<experiment_name>_<date>_<time>.csv (where the text between the angle brackets is a place-holder for the actual values)
The participant ID is what you entered in the participant field of the start-up dialogue. The experiment name can be found under Experiment settings → Basic → Experiment name. By default, this will be the name under which you saved your experiment.
You can change this file naming convention under “Experiment Settings” → “Data” → “Data filename”. Some knowledge of Python is required to change this though.
20.3 File content
20.3.1 What are the rows?
Apart from the header, each row in the .csv file corresponds to one trial. Rows are ordered chronologically (i.e., from first to last trial).
20.3.2 What information is in the columns?
- All the information from the input file.
- Information from the startup dialogue window (e.g., participant ID).
- Information associated with your response component:
- Key pressed:
<name_of_your_response_component>.keys - Response time:
<name_of_your_response_component>.rt - Accuracy:
<name_of_your_response_component>.corr(this column will only exist if you used “Store correct”)
- Key pressed:
- Information about the loops:
- Every loop gets a few columns to itself.
- The header of these columns will start with the name of the loop, e.g.
trials. - The various loop-related columns are:
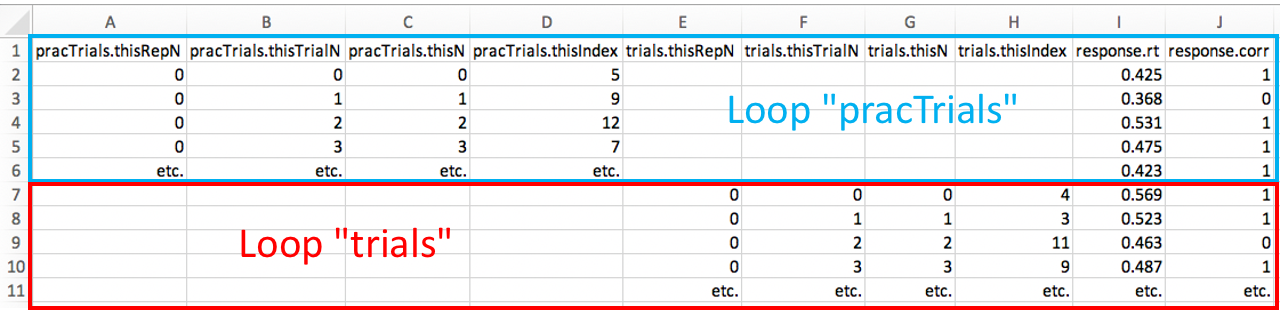
.thisRepN: How often has this loop been run?.thisTrialN: What is the trial number in this loop? (Resets when the loop repeats.).thisN: What is the overall trial number? (Does not reset when the loop repeats.).thisIndex: The line number in the input file that was used to run the experiment.
- You will not usually need information from these columns, but they are useful for identifying from which loop RTs and accuracies come from (see below for an example).
- Information about the onset and offset of components:
.started: Onset time in seconds (relative to the start of the experiment)..stopped: Offset time in seconds (relative to the start of the experiment).- Again, you will not usually need information from these columns.
- In addition, there will be columns for date, frame rate, experiment name and PsychoPy version. You will usually not need to look at these columns.
Note the following key pieces of information:
- Counting in PsychoPy starts with 0. Thus, the first trial will have the number 0, not 1.
- All times are in seconds. For example, a response time of 0.581 means that the response time was 0.581 seconds or 581 milliseconds (ms).
- The most relevant columns are usually the response time, the accuracy and the condition (information about the condition is something that will usually come from your input file).
- Separate loops are associated with separate columns in the output file.
Here is a simplified representation of how loops can be identified in output files: